10 August 2016

Cutting and stitching Princess cut blouse.

Cutting and stitching Princess cut blouse.

For the stitching of Princess cut blouse, following are the measurement required:-

STEP1:- Length+2 inch
STEP2:- Breadth (chest circumference)+6 divided by 4+1
STEP3:- Shoulder -1divided by 2
STEP4:- Sleeve length+2inch and breadth(original chest circumference)divided by 5+1/2 inch
STEP5:- Waist divided by 4+1/2inch.

Seeing the figure do the marking and the cutting of the cloth.
1: First you have to fold your sleeve 1inch inside join the under arm and keep it separate.

2: Seeing the figure stitch where is mark*. You have to stitch which no. is there start and ending point                   will be 0, see the figure and do it.

3: Now you have to attach the shoulder and join front side huck and hold belt, both belt breadth should be 3inch and length will be as your front piece +2and 1/2 inch. Attach there both belt(see the figure and do it).

4:Now you have to attach neck side cross piece and put paipin on full neck.

5:Now you have to join both side arm.Next you have to attach sleeves,and in last you have to put button and make hole.

Your Princess cut blouse is ready!


Author: Mrs. Bhawna Gupta is a professional tailor for ladies dresses (Indian Blouse, Chudidar, Salwar Suit, Maxi, Frock, Kids Skirts, Tops etc) over more than a decade. She had completed the Advanced Diploma in Tailoring from Madras Institute of Tailoring. Disclaimer - This BLOG is published for learning purpose. Author has no liability for any damage or loss. This blog cannot used for commercial, publishing in other electronic media purposes.


Step by step cutting and stitching Princess cut blouse.

Step by step cutting and stitching Princess cut blouse.

For the stitching of Princess cut blouse, following are the measurement required:-

STEP1:- Length+2 inch
STEP2:- Breadth (chest circumference)+6 divided by 4+1
STEP3:- Shoulder -1divided by 2
STEP4:- Sleeve length+2inch and breadth(original chest circumference)divided by 5+1/2 inch
STEP5:- Waist divided by 4+1/2inch.

Seeing the figure do the marking and the cutting of the cloth.
1: First you have to fold your sleeve 1inch inside join the under arm and keep it separate.

2: Seeing the figure stitch where is mark*. You have to stitch which no. is there start and ending point                   will be 0, see the figure and do it.

3: Now you have to attach the shoulder and join front side huck and hold belt, both belt breadth should be 3inch and length will be as your front piece +2and 1/2 inch. Attach there both belt(see the figure and do it).

4:Now you have to attach neck side cross piece and put paipin on full neck.

5:Now you have to join both side arm.Next you have to attach sleeves,and in last you have to put button and make hole.

Your Princess cut blouse is ready!


Author: Mrs. Bhawna Gupta is a professional tailor for ladies dresses (Indian Blouse, Chudidar, Salwar Suit, Maxi, Frock, Kids Skirts, Tops etc) over more than a decade. She had completed the Advanced Diploma in Tailoring from Madras Institute of Tailoring. Disclaimer - This BLOG is published for learning purpose. Author has no liability for any damage or loss. This blog cannot used for commercial, publishing in other electronic media purposes.


How to stitch Princess cut blouse?

How to stitch Princess cut blouse?

For the stitching of Princess cut blouse, following are the measurement required:-

STEP1:- Length+2 inch
STEP2:- Breadth (chest circumference)+6 divided by 4+1
STEP3:- Shoulder -1divided by 2
STEP4:- Sleeve length+2inch and breadth(original chest circumference)divided by 5+1/2 inch
STEP5:- Waist divided by 4+1/2inch.

Seeing the figure do the marking and the cutting of the cloth.
1: First you have to fold your sleeve 1inch inside join the under arm and keep it separate.

2: Seeing the figure stitch where is mark*. You have to stitch which no. is there start and ending point                   will be 0, see the figure and do it.

3: Now you have to attach the shoulder and join front side huck and hold belt, both belt breadth should be 3inch and length will be as your front piece +2and 1/2 inch. Attach there both belt(see the figure and do it).

4:Now you have to attach neck side cross piece and put paipin on full neck.

5:Now you have to join both side arm.Next you have to attach sleeves,and in last you have to put button and make hole.

Your Princess cut blouse is ready!


Author: Mrs. Bhawna Gupta is a professional tailor for ladies dresses (Indian Blouse, Chudidar, Salwar Suit, Maxi, Frock, Kids Skirts, Tops etc) over more than a decade. She had completed the Advanced Diploma in Tailoring from Madras Institute of Tailoring. Disclaimer - This BLOG is published for learning purpose. Author has no liability for any damage or loss. This blog cannot used for commercial, publishing in other electronic media purposes.


13 July 2016

Cutting and Stitching of Top Balloon in style with sleeve.

Cutting and Stitching of Top Balloon in style with sleeve.

How to stitch Top Ballon in style?

For this top you need same size inner cloth and one elastic which one length according to your wast and breadth 1/2 inch.

STEP1-: First take the following measures:
A: Length (shoulder to how long you need)+4inch.
B: Chest circumference divided by 4+1inch.
C: Neck:
               Front neck: 5inch (your wish)
               Back neck: 3inch (your wish)
D: Shoulder to shoulder +2 divided by 2,
E: 1: Sleeve Length +1 inch,
     2: Sleeve Breadth (chest circumference divided by 4) -1
     3: Wrist circumference+1/2inch.

STEP2-: Seeing the figure do the marking and the cutting of the cloth (you have to cut both the cloth)

STEP3-: First you have to join all same size pieces together. Now bottom side of the top you have to fold 1inch inside and insert there elastic.

STEP4-: Now join both the shoulder sides.

STEP5-: Seeing the figure do the marking and the cutting of the sleeves. Now attach the sleeves on your top.

STEP6-: Now join both the sides.

Congratulations:- Your Top in Balloon style is ready!


Author: Mrs. Bhawna Gupta is a professional tailor for ladies dresses (Indian Blouse, Chudidar, Salwar Suit, Maxi, Frock, Kids Skirts, Tops etc) over more than a decade. She had completed the Advanced Diploma in Tailoring from Madras Institute of Tailoring. 
Disclaimer - This BLOG is published for learning purpose. Author has no liability for any damage or loss. This blog cannot used for commercial, publishing in other electronic media purposes.


How to stitch balloon look frock with balloon sleeve?

How to stitch balloon look frock with balloon sleeve?

MEASUREMENT:-

Firstly we will take the measures:

A-: Length [shoulder to waist]+2
B-: Waist +5 divided by 4
C-: Length (shoulder to shoulder) +2 divided by 2
D-: Length (waist to knee) +5 inch
E-: Waist +10 divided by 2
F-: Front and back neck 2 inch or as long as your wish.
G-: Canvas cloth length-D-2, and breadth is equal to your D
H-: Length of the Sleeve +1inch
  I-: Circumference of the Sleeve+5inchMARKING AND CUTTING:

Seeing the figure do the marking and the cutting of the cloth.

STITCHING:

First join both the shoulder pieces. Next fold both front and back side neck.


Step2- Now take the measures and cut the cloth according to the diagram.

How to stitch?

Step3- Now start stitching. First fold 1/2inch from downside.

Step4- Next fold the sleeve length of 1inch and insert there elastic.

Step5- Next fold both neck side, then start stitching from the sleeve.

Now you have to stitch side and go till the hip.

 Next join waist side of cloth on canvas, now join bottom inside and turn it, next make frill on waist side. Then join upper and lower pieces of waist.

Your Balloon Frock is ready!


Author: Mrs. Bhawna Gupta is a professional tailor for ladies dresses (Indian Blouse, Chudidar, Salwar Suit, Maxi, Frock, Kids Skirts, Tops etc) over more than a decade. She had completed the Advanced Diploma in Tailoring from Madras Institute of Tailoring. Disclaimer - This BLOG is published for learning purpose. Author has no liability for any damage or loss. This blog cannot used for commercial, publishing in other electronic media purposes.


Cutting and Stitching of balloon look frock with balloon sleeve.

Cutting and Stitching of balloon look frock with balloon sleeve.

MEASUREMENT:-

Firstly we will take the measures:

A-: Length [shoulder to waist]+2
B-: Waist +5 divided by 4
C-: Length (shoulder to shoulder) +2 divided by 2
D-: Length (waist to knee) +5 inch
E-: Waist +10 divided by 2
F-: Front and back neck 2 inch or as long as your wish.
G-: Canvas cloth length-D-2, and breadth is equal to your D
H-: Length of the Sleeve +1inch
  I-: Circumference of the Sleeve+5inchMARKING AND CUTTING:

Seeing the figure do the marking and the cutting of the cloth.

STITCHING:

First join both the shoulder pieces. Next fold both front and back side neck.


Step2- Now take the measures and cut the cloth according to the diagram.

How to stitch?

Step3- Now start stitching. First fold 1/2inch from downside.

Step4- Next fold the sleeve length of 1inch and insert there elastic.

Step5- Next fold both neck side, then start stitching from the sleeve.

Now you have to stitch side and go till the hip.

 Next join waist side of cloth on canvas, now join bottom inside and turn it, next make frill on waist side. Then join upper and lower pieces of waist.

Your Balloon Frock is ready!


Author: Mrs. Bhawna Gupta is a professional tailor for ladies dresses (Indian Blouse, Chudidar, Salwar Suit, Maxi, Frock, Kids Skirts, Tops etc) over more than a decade. She had completed the Advanced Diploma in Tailoring from Madras Institute of Tailoring. Disclaimer - This BLOG is published for learning purpose. Author has no liability for any damage or loss. This blog cannot used for commercial, publishing in other electronic media purposes.


Easy way to Cutting and Stitching of Shorts.

Easy way to Cutting and Stitching of Shorts.

STEP1-: First take the measures according to:
               length:   Side length (waist to as long as you need)+2 inch.
               breadth: Waist+10 inch divided by 4.
               Bottom side circumference+1inch.

               *If your age is more then 10 years then you have to mark 2and 1/2 inch.
                Otherwise 1and1/2inch.*(see this mark in figure)

STEP2-: Seeing the figure,cut the cloth.

STEP3-: Now fold1/2 inch from bottom side .

 Next fold waist side 1 inch(for inserting  an elastic).

 Now join both the pieces.

 Your Short is ready!


Author: Mrs. Bhawna Gupta is a professional tailor for ladies dresses (Indian Blouse, Chudidar, Salwar Suit, Maxi, Frock, Kids Skirts, Tops etc) over more than a decade. She had completed the Advanced Diploma in Tailoring from Madras Institute of Tailoring. Disclaimer - This BLOG is published for learning purpose. Author has no liability for any damage or loss. This blog cannot used for commercial, publishing in other electronic media purposes.

How to stitch Top Balloon in style?

How to stitch Top Ballon in style?
For this top you need same size inner cloth and one elastic which one length according to your wast and breadth 1/2 inch.
STEP1-: First take the following measures:
A: Length (shoulder to how long you need)+4inch.
B: Chest circumference divided by 4+1inch.
C: Neck:
               Front neck: 5inch (your wish)
               Back neck: 3inch (your wish)
D: Shoulder to shoulder +2 divided by 2,
E: 1: Sleeve Length +1 inch,
     2: Sleeve Breadth (chest circumference divided by 4) -1
     3: Wrist circumference+1/2inch.
STEP2-: Seeing the figure do the marking and the cutting of the cloth (you have to cut both the cloth)
STEP3-: First you have to join all same size pieces together. Now bottom side of the top you have to fold 1inch inside and insert there elastic.
STEP4-: Now join both the shoulder sides.
STEP5-: Seeing the figure do the marking and the cutting of the sleeves. Now attach the sleeves on your top.
STEP6-: Now join both the sides.
Congratulations:- Your Top in Balloon style is ready!


Author: Mrs. Bhawna Gupta is a professional tailor for ladies dresses (Indian Blouse, Chudidar, Salwar Suit, Maxi, Frock, Kids Skirts, Tops etc) over more than a decade. She had completed the Advanced Diploma in Tailoring from Madras Institute of Tailoring. 
Disclaimer - This BLOG is published for learning purpose. Author has no liability for any damage or loss. This blog cannot used for commercial, publishing in other electronic media purposes.


12 July 2016

Cutting and Stitching of Sleeveless Dress (Long Dress)?

Cutting and Stitching of Sleeveless Dress (Long Dress)?
For the upper part:-
Measurement:-
1) Length:- shoulder to waist +2inch.
2) Breadth:- Chest side circumference +2.
3) Waist side circumference + 2.
4) Neck:-
front neck 5inch or your wish and back neck 3inch.
Stitch:-

Do the cut at shoulder side and make a fold inside and stitch. First fold both the arm side and then neck side. If you wish you can attach a lace or stitch a pain there.
Attach a zip at backside and keep this piece separate.

For the Lower Part:-
Length:  waist to toe +2 inch,
Breadth: waist circumference +3 and as per your need seeing the figure do the marking and                cutting of the cloth.

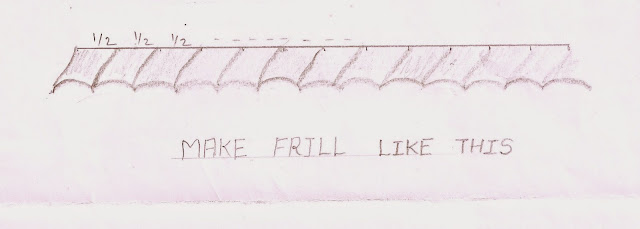
Fold bottom side 1inch and join waist side. Make 3 frills on both the sides. Next join both the sides. If you wish at the waist side you can stitch a belt.

How to stitch a belt?
Take a cloth of 15inch length and 4inch breadth.
Now stitch three sides and turn inside out. Now you can stitch this belt your dress.

Congratulations:- Your sleeveless dress (long dress)is ready!


Author: Mrs. Bhawna Gupta is a professional tailor for ladies dresses (Indian Blouse, Chudidar, Salwar Suit, Maxi, Frock, Kids Skirts, Tops etc) over more than a decade. She had completed the Advanced Diploma in Tailoring from Madras Institute of Tailoring. 
Disclaimer - This BLOG is published for learning purpose. Author has no liability for any damage or loss. This blog cannot used for commercial, publishing in other electronic media purposes.

How to stitch sleeveless dress (long dress)?

How to stitch sleeveless dress (long dress)?

For the upper part:-
Measurement:-
1) Length:- shoulder to waist +2inch.
2) Breadth:- Chest side circumference +2.
3) Waist side circumference + 2.
4) Neck:-
front neck 5inch or your wish and back neck 3inch.
Stitch:-

Do the cut at shoulder side and make a fold inside and stitch. First fold both the arm side and then neck side. If you wish you can attach a lace or stitch a pain there.
Attach a zip at backside and keep this piece separate.

For the Lower Part:-
Length:  waist to toe +2 inch,
Breadth: waist circumference +3 and as per your need seeing the figure do the marking and                cutting of the cloth.

Fold bottom side 1inch and join waist side. Make 3 frills on both the sides. Next join both the sides. If you wish at the waist side you can stitch a belt.

How to stitch a belt?
Take a cloth of 15inch length and 4inch breadth.
Now stitch three sides and turn inside out. Now you can stitch this belt your dress.

Congratulations:- Your sleeveless dress (long dress)is ready!


Author: Mrs. Bhawna Gupta is a professional tailor for ladies dresses (Indian Blouse, Chudidar, Salwar Suit, Maxi, Frock, Kids Skirts, Tops etc) over more than a decade. She had completed the Advanced Diploma in Tailoring from Madras Institute of Tailoring. 
Disclaimer - This BLOG is published for learning purpose. Author has no liability for any damage or loss. This blog cannot used for commercial, publishing in other electronic media purposes.

Cutting and stitching of a frill on from side of a pillow cover.

Cutting and stitching of a frill on front side of a pillow cover.

Step1:- Cut your cloth for your pillow size + 1 inch.

Step2:- Now fold 1/2 inch and make a stitch on the side which you wish to keep open.

Step3:- Next cut a long belt,
  length:- length of your pillow * 6
breadth:- 4 inch.
Seeing the figure do pico on one side. Other side make frills of 1/2 inches.

Step4:- Mark a square or round shape as per your wish seeing the figure on the cover.

Step5:- When your frill is ready attach this frill on your pillow's front side (Seeing the figure).

Step6:- Now complete this belt till end.

Step7:- Next join pillow cover cloth from three sides leaving one side open.

Congratulations:- Your Frill on front side of the pillow cover is ready!


Author: Mrs. Bhawna Gupta is a professional tailor for ladies dresses (Indian Blouse, Chudidar, Salwar Suit, Maxi, Frock, Kids Skirts, Tops etc) over more than a decade. She had completed the Advanced Diploma in Tailoring from Madras Institute of Tailoring. 
Disclaimer - This BLOG is published for learning purpose. Author has no liability for any damage or loss. This blog cannot used for commercial, publishing in other electronic media purposes.

How to stitch frill on front side Pillow Cover?

How to stitch a frill on front side of a Pillow Cover?

Step1:- Cut your cloth for your pillow size + 1 inch.

Step2:- Now fold 1/2 inch and make a stitch on the side which you wish to keep open.

Step3:- Next cut a long belt,
  length:- length of your pillow * 6
breadth:- 4 inch.
Seeing the figure do pico on one side. Other side make frills of 1/2 inches.

Step4:- Mark a square or round shape as per your wish seeing the figure on the cover.

Step5:- When your frill is ready attach this frill on your pillow's front side (Seeing the figure).

Step6:- Now complete this belt till end.

Step7:- Next join pillow cover cloth from three sides leaving one side open.

Congratulations:- Your Frill on front side of the pillow cover is ready!


Author: Mrs. Bhawna Gupta is a professional tailor for ladies dresses (Indian Blouse, Chudidar, Salwar Suit, Maxi, Frock, Kids Skirts, Tops etc) over more than a decade. She had completed the Advanced Diploma in Tailoring from Madras Institute of Tailoring. 
Disclaimer - This BLOG is published for learning purpose. Author has no liability for any damage or loss. This blog cannot used for commercial, publishing in other electronic media purposes.


11 July 2016

Cutting and Stitching of Frill Table cloth for Round Table.

Cutting and Stitching of Frill Table cloth for Round table.

Stitching a Frill table cloth for Round table is very easy.

Step 1: Take the measurement of your round table.

Step 2: Cut the cloth (as of same size of table+1/2 inch) in round cloth.
For the Frill:-
Measurements:-
Length:- measurements of the cloth multiplied by 4
Breadth:- minimum 6 inches
Stitching of the frill:-
First fold 1/2 inch from bottom side. Stitch frill of 1/2 inch from upside of the cloth till it meets the fold (of bottom side). You may refer to the figures.
Step 4: Join this piece of cloth to your round table cloth.
Congratulations:- Your Frill Table cloth is ready!


Author: Mrs. Bhawna Gupta is a professional tailor for ladies dresses (Indian Blouse, Chudidar, Salwar Suit, Maxi, Frock, Kids Skirts, Tops etc) over more than a decade. She had completed the Advanced Diploma in Tailoring from Madras Institute of Tailoring. 
Disclaimer - This BLOG is published for learning purpose. Author has no liability for any damage or loss. This blog cannot used for commercial, publishing in other electronic media purposes.

How to stitch a Frill Table cloth for Round Table?

How to stitch Frill Table cloth for Round table?

Stitching a Frill table cloth for Round table is very easy.

Step 1: Take the measurement of your round table.
Step 2: Cut the cloth (as of same size of table+1/2 inch) in round cloth.

For the Frill:-
Measurements:-
Length:- measurements of the cloth multiplied by 4
Breadth:- minimum 6 inches
Stitching of the frill:-
First fold 1/2 inch from bottom side. Stitch frill of 1/2 inch from upside of the cloth till it meets the fold (of bottom side). You may refer to the figures.
Step 4: Join this piece of cloth to your round table cloth.
Congratulations:- Your Frill Table cloth is ready!


Author: Mrs. Bhawna Gupta is a professional tailor for ladies dresses (Indian Blouse, Chudidar, Salwar Suit, Maxi, Frock, Kids Skirts, Tops etc) over more than a decade. She had completed the Advanced Diploma in Tailoring from Madras Institute of Tailoring. 
Disclaimer - This BLOG is published for learning purpose. Author has no liability for any damage or loss. This blog cannot used for commercial, publishing in other electronic media purposes.

8 July 2016

Cutting and Stitching of a poncho.

Cutting and Stitching of a poncho.

Presenting a very easy way to stitch a Poncho in few steps:-

Requirements:- a beautiful cloth of 1 meter.
Measurements:-
1:-Length: (shoulder to waist)+1/2 inch
2:-Breadth: chest circumference
3:-Shoulder to shoulder
4:-Front and back neck 1and 1/2 inch.

Step 1:- Firstly fold the cloth from the centre and fold again.(Do refer to the figure)
Step 2:- Do the marking of your shoulder and length. Do the cutting of neck side only.(For the cutting refer to the figure)
Step 3:- Do the folding from bottom side (1/2 inch) inside.
Step 4:- Do the folding of neck side (1/4 inch) inside.
Step 5:- Seeing the figure make a simple stitch from arm part to the bottom.

Congratulations: Your Poncho is ready!


Author: Mrs. Bhawna Gupta is a professional tailor for ladies dresses (Indian Blouse, Chudidar, Salwar Suit, Maxi, Frock, Kids Skirts, Tops etc) over more than a decade. She had completed the Advanced Diploma in Tailoring from Madras Institute of Tailoring. 
Disclaimer - This BLOG is published for learning purpose. Author has no liability for any damage or loss. This blog must not be used for commercial purposes or for publishing in other electronic media purposes.


7 July 2016

How to stitch a Poncho?

How to stitch a poncho?

Presenting a very easy way to stitch a Poncho in few steps:-

Requirements:- a beautiful cloth of 1 meter.
Measurements:-
1:-Length: (shoulder to waist)+1/2 inch
2:-Breadth: chest circumference
3:-Shoulder to shoulder
4:-Front and back neck 1and 1/2 inch.

Step 1:- Firstly fold the cloth from the centre and fold again.(Do refer to the figure)
Step 2:- Do the marking of your shoulder and length. Do the cutting of neck side only.(For the cutting refer to the figure)
Step 3:- Do the folding from bottom side (1/2 inch) inside.
Step 4:- Do the folding of neck side (1/4 inch) inside.
Step 5:- Seeing the figure make a simple stitch from arm part to the bottom.

Congratulations: Your Poncho is ready!


Author: Mrs. Bhawna Gupta is a professional tailor for ladies dresses (Indian Blouse, Chudidar, Salwar Suit, Maxi, Frock, Kids Skirts, Tops etc) over more than a decade. She had completed the Advanced Diploma in Tailoring from Madras Institute of Tailoring. 
Disclaimer - This BLOG is published for learning purpose. Author has no liability for any damage or loss. This blog must not be used for commercial purposes or for publishing in other electronic media purposes.


6 April 2016

Cutting and Stitching of new saree.


Cutting and Stitching of new saree.

Friends, stitching a saree is not difficult at all, you can stitch your saree by your own very easily.

Requirements: 3-5 different types of sarees, laces(optional) and other required stitching equipments.
Steps for stitching:

1: Take three to five different type of sarees. Cut your sarees according to your cloth. (Normal length of sarees is 5and 1/2 to 6 metres.)

2: Stitch all the pieces. At the joints (where you have stitched the sarees) stitch a lace or do the paipin work to make it look good. (and also to hide all the stitch lines!)

3: At the bottom stitch a broad lace to make it look more attractive. After completing all the stitching and decorating do the fall work.

Congratulations! Your Saree is ready!


How to stitch saree your own?

How to stitch saree your own?

Friends, stitching a saree is not difficult at all, you can stitch your saree by your own very easily.

Requirements: 3-5 different types of sarees, laces(optional) and other required stitching equipments.
Steps for stitching:

1: Take three to five different type of sarees. Cut your sarees according to your cloth. (Normal length of sarees is 5and 1/2 to 6 metres.)

2: Stitch all the pieces. At the joints (where you have stitched the sarees) stitch a lace or do the paipin work to make it look good. (and also to hide all the stitch lines!)

3: At the bottom stitch a broad lace to make it look more attractive. After completing all the stitching and decorating do the fall work.

Congratulations! Your Saree is ready!


5 April 2016

How to stitch a saree? (by using old sarees)

How to stitch a saree? (by using old sarees)

Friends, stitching a saree is not difficult at all, you can stitch your saree by your own very easily.

Requirements: 3-5 different types of sarees, laces(optional) and other required stitching equipments.
Steps for stitching:
1: Take three to five different type of sarees. Cut your sarees according to your cloth. (Normal length of sarees is 5and 1/2 to 6 metres.)
2: Stitch all the pieces. At the joints (where you have stitched the sarees) stitch a lace or do the paipin work to make it look good. (and also to hide all the stitch lines!)
3: At the bottom stitch a broad lace to make it look more attractive. After completing all the stitching and decorating do the fall work.

Congratulations! Your Saree is ready!


24 January 2016

Step by Step Pico on your cloth on your own.

Step by Step Pico on your cloth on your own.

1:-First seeing the figure fold your cloth twice and then start to stitch.

2:-Keep your needle upside it should go down always up to down get it cross and again take it up and go down cross do it on full cloth like this then opposite side start and go down across do it on your full cloth.

3:-Seeing the figure complete it.

 You can pico on your cloth your own!


Author: Mrs. Bhawna Gupta is a professional tailor for ladies dresses (Indian Blouse, Chudidar, Salwar Suit, Maxi, Frock, Kids Skirts, Tops etc) over more than a decade. She had completed the Advanced Diploma in Tailoring from Madras Institute of Tailoring. Disclaimer - This BLOG is published for learning purpose. Author has no liability for any damage or loss. This blog cannot used for commercial, publishing in other electronic media purposes.


Step by Step how to cut and stitch Lining Top.

Step by Step how to cut and stitch Lining Top.

For this top you need to keep two pieces (inner one and outer one) of equal measurement (in terms of length and breadth).

STEP1-: First take the following measures:

A: Length (shoulder to how long you need)+2inch.
B: Chest circumference divided by 4+2inch.
C: Neck:
               Front neck: 5inch (your wish)
               Back neck: 3inch (your wish)
D: Shoulder to shoulder +2 divided by 2,
E: 1: Sleeve Length +1 inch,
     2: Sleeve Breadth (chest circumference divided by 4 -1)
     3: Wrist circumference+1/2inch.

STEP2-: Seeing the figure do the marking and the cutting of the cloth (you have to cut both the cloth)

STEP3-: First you have to join all same size pieces together. Now you have to fold  bottom side 1/2inch.

STEP4-: Now join both the shoulder sides.

STEP5-: Seeing the figure do the marking and the cutting of the sleeves.  Now fold sleeve corner and attach the sleeves on your top.

STEP6-: Now join both the sides.

Your lining Top is ready!


Author: Mrs. Bhawna Gupta is a professional tailor for ladies dresses (Indian Blouse, Chudidar, Salwar Suit, Maxi, Frock, Kids Skirts, Tops etc) over more than a decade. She had completed the Advanced Diploma in Tailoring from Madras Institute of Tailoring. Disclaimer - This BLOG is published for learning purpose. Author has no liability for any damage or loss. This blog cannot used for commercial, publishing in other electronic media purposes.

Step by Step Cutting and Stitching of simple Brassier (Front Button).

Step by Step Cutting and Stitching of simple Brassier (Front Button).

Step1-:A: Front length+1inch
            B: Back length+2inch
            C: Waist+4 divided by 4
            D: Chest circumference+6 and divided by 4
            E: Front neck 6inch and back neck 8inch or your wish.

Step2-: First take the measurement then do the marking and the cutting of the cloth.

Step3-: Now fold all the corners, then front and back side stitch inside. Now join front side belt.

Step4-: Next join the shoulder and stitch the sides.

Step5-: Now put the buttons and make a hole.

Your Brassier is ready!


Author: Mrs. Bhawna Gupta is a professional tailor for ladies dresses (Indian Blouse, Chudidar, Salwar Suit, Maxi, Frock, Kids Skirts, Tops etc) over more than a decade. She had completed the Advanced Diploma in Tailoring from Madras Institute of Tailoring. Disclaimer - This BLOG is published for learning purpose. Author has no liability for any damage or loss. This blog cannot used for commercial, publishing in other electronic media purposes
                                                

Step by Step Cutting and Stitching of Elastic Sleeve.

Step by Step Cutting and Stitching of Elastic Sleeve.

1:-First take your sleeve piece and seeing the figure and mark.

2:-Attach an elastic there of length: 5inch elastic breadth: 1/2inch.

3:-While stitching elastic you have to little pull the elastic and stitch.(While pulling elastic niddle  should be up side).

4:-Now you can join your sleeve.

Your Elastic Sleeve is ready!

Author: Mrs. Bhawna Gupta is a professional tailor for ladies dresses (Indian Blouse, Chudidar, Salwar Suit, Maxi, Frock, Kids Skirts, Tops etc) over more than a decade. She had completed the Advanced Diploma in Tailoring from Madras Institute of Tailoring. Disclaimer - This BLOG is published for learning purpose. Author has no liability for any damage or loss. This blog cannot used for commercial, publishing in other electronic media purposes.

Step by Step Cutting and Stitching of Collar Frock.

Step by Step Cutting and Stitching of Collar Frock.

Step 1:-MEASUREMENT

Firstly we will take the measures:
A-: Length [shoulder to waist]+2
B-: Waist +5 divided by 4
C-: Length (shoulder to shoulder) +2 divided by 2
D-: Length (waist to knee) +2 inch
E-: Waist +10 divided by 2
F-: Front and back neck 2 inch or as long as your wish.
G-: Take a canvas cloth according to your neck and do the drawing and cutting of the collar and attach a cloth piece.
H-: Sleeve length+2inch and sleeve circumference+1inch.

Step2:-MARKING AND CUTTING:

Seeing the figure do the marking and the cutting of the cloth.

Step3:-STITCHING:

First join both the shoulder pieces. Next attach the collar. Now make your sleeves. First fold corner of sleeves and attach arm side. Next join waist side of cloth. Then join upper and lower pieces of waist.

Step4:-How to stitch a Collar:-

First you have to cut the shape of canvas and two piece of cloth for each. Keep down side both cloth up side canvas, then stitch three sides and turn it then canvas will be inside now attach your open side your frock neck.

While joining your upper and bottom piece you have to attach side belt.

Your Collar Frock is ready!


 Author: Mrs. Bhawna Gupta is a professional tailor for ladies dresses (Indian Blouse, Chudidar, Salwar Suit, Maxi, Frock, Kids Skirts, Tops etc) over more than a decade. She had completed the Advanced Diploma in Tailoring from Madras Institute of Tailoring. Disclaimer - This BLOG is published for learning purpose. Author has no liability for any damage or loss. This blog cannot used for commercial, publishing in other electronic media purposes.